Oh Christmas Tree
I wanted to share my tree with you!
and the ornaments I've made...
Ornaments I made last year!
*holiday girls
*holiday houses
*cupcakes
*owls
*sheriff badges
Ornaments I made this year
*old shirt pom poms
*camo balls
*Mississippi maps
*cameras
I also pinned a few
Instagram pictures with
old clothes pins to the tree!
They turned out really cute, here's a few.
Different views...
Labels:
camera
,
camo
,
Christmas
,
clothes pins
,
handmade
,
holiday girl
,
instagram
,
map
,
mississippi
,
ornament
,
pom pom
,
she art
Old to New
Last week I posted a picture on facebook
of a bracelet I made.
I've had several people ask
about the bracelet. So, I wanted to share
just how I made it!
Take these old shirts
and make this Cute red, green and blue
Christmas bracelet...
This year while getting ready
to make a few ornaments for my Christmas tree
I knew I would use some old clothes
I saved from last year
while cleaning out closets.
I tossed the bags of clothes in the attic
before actually taking them to Goodwill.
When that time came to take them,
I begin viewing the old clothes
as potential items to make something.
Not knowing what that something would be,
not knowing when the time would be,
I kept the shirts, on my art shelf they went!
Preparing to make a Christmas ornament,
I cut long strips of all three
colors out of the backs of the shirts.
I played with those strips for a day
realizing they would make a
cute braid bracelet.
Only I didn't know
how I would attach the
ends of the bracelet together
to make it presentable.
So the next day I finally
come up with what
ornament I would make.
Doing a little research on Pinterest
I found the pom pom ornament
I envisioned making.
(picture of ornament is later in this post)
Moving past the ornament making
for a moment, I was standing
in line at Hobby Lobby one day
after making my ornament
still thinking about
making a bracelet.
I picked up a magazine while I waited.
There it was bracelet making. See
do your homework, research, and your
sure to find your answer.
They showed how to simply sew
the ends together. Bam, there it was!
Off to bracelet making land
here's how I did it.
cut my strips out of the backs of old shirts
safety pinned them together attached to something,
I used my jacket in this picture. It was all
I had one day in car pool.
start your braid, braid as tight or loose as you like
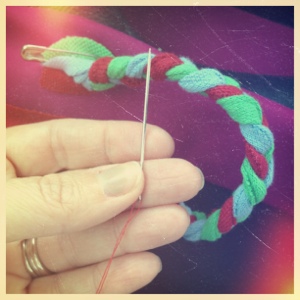
thread your needle
release from safety pin
and sew your ends together
once your done cut the end off, each
strand individually.
Now here's
the
ornament I made...
like the strands use to make the bracelets,
around a piece of cardboard wedging a piece
of twine between the strands and
cardboard. The twine is then tied to hold
all the pieces together. Tied tight!
Slipping the tied strands
off the cardboard
I cut the circled strands
in half!
This gives you a pom pom look!
I am very in love with
my ornaments.
It took me a time or two to perfect
how tight to wrap the strands and
just where to cut getting the look I personally
wanted.
I also tied another piece of
the twine already used to make a
hanger.
People often ask
how I come up with my ideas.
As far back as I can remember as a child,
I remember looking at stuff
and telling myself if I had the right materials
I could make that
or
look at stuff
and imagine making something
out of it.
Well this has carried on into my
adult life and I am just at a point in
my life where I am able to put this to practice.
I hope you enjoy!
If you make something
share it with me,
I'd love to see it...
P.S. this is the second time
writing this blog post. I lost the first
one some how....sad face!
Subscribe to:
Comments
(
Atom
)


